03. Customization with Python scripts
Syntalos allows users to write custom Python scripts to control module behavior, to realize a wite array of different experiments and to tailor module behavior to the user’s need. This tutorial is a basic introduction for using the Python Script module in Syntalos. It is also available as a video at “V2. Brief introduction to Python scripting”.
1. Preparations
We want to create a project that emits a sound at regular intervals.
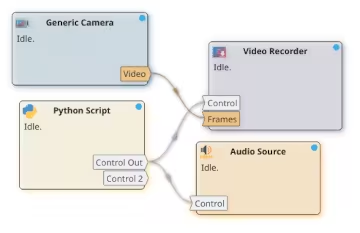
Create a new Syntalos project and add an Audio Source and a Python Script module.
Notice the Control input port on the Audio Source module: It looks like we can use it
to control the activity of this module via it! Unfortunately, the Python Script does not seem
to have any input or output ports!
We will change that in the next step.
2. Adding ports
In order to control other modules from our Python script module, we need it to have an output port to even emit data. Double-click the Python module or click on Settings after selecting it).
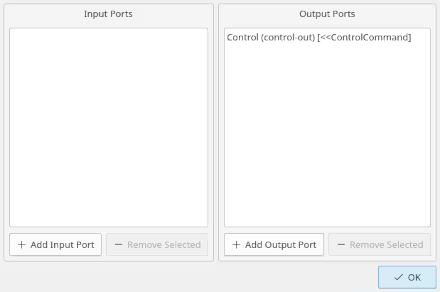
A new window opens which lets you edit the Python code. We ignore that for now and click on the Edit Ports button in the window’s toolbar at the top. A new Port Editor dialog opens, which allows for adding new ports to our script module. Since we want to add an output port, click on Add Output Port.
In the next step, you will be asked which kind of data the output port emits. Select ControlCommand
from the list. The next question is for an internal name of the port that we will use in our script.
Enter control-out and confirm. The next question is about a human name for the port that will be
displayed on Syntalos’ user interface. Just enter Control there.
Then confirm all changes with OK:
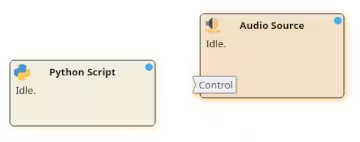
After that, a Control output port on the Python Script module should appear. Connect it to the Control input port of your Audio Source as usual!
3. Module coding basics
Now we can look at the Python script itself! The default script is larger than it needs to be due to annotations
to help you get started. Writing the script is a lot simpler than it may first appear though:
4 functions exists that Syntalos may call at different stages of an experiment run.
The prepare() function is called when the experimence is started, but before all modules are ready, the
start() function is called immediately before data starts being acquired, run is called when the experiment
is started and mainly handles communication with Syntalos, and stop() is called when the experiment is stopped.
We are primarily concerned with the prepare() function here, as we do not need to prepare any data or device
in our script. Interaction with Syntalos happens via the syntalos_mlink module, which is imported by default
as syl.
First, we need to get a Python reference to the control-out output port that we just defined in the port editor.
This should happen before even prepare() is called, so we put it at the top of the Python file:
oport = syl.get_output_port('control-out')The get_output_port() method takes the internal port name as parameter, that we previously defined in the port editor.
With the reference we obtained on the output port, we can now can emit messages on this port.
4. Controlling a module
The ControlCommand datatype we selected for our output port is Syntalos’ generic data structure for controlling
the state of most modules. You can start modules, stop them or let them run for a set amount of seconds.
This is useful for example if you only want to record a video for a selected amount of time.
For now though, we just want to emit a 2 sec audio cue every 5 seconds. This can be done with this simple snippet
of Python code (this is the whole script file):
| |
The start() function is called immediately when the experiment is started and has to complete immediately.
To launch our custom code, we define a function called send_beep() that we run once the experiment was started.
In send_beep() we first define a ControlCommand that we want to
send to the Audio Source, and tell it to be of kind START and instruct it to hold that state for 2000 milliseconds
before falling back to its previous state (via ctl.duration).
Using oport.submit(ctl), we send this command out on the previously defined output port oport.
If we are no longer running (if syl.is_running() returns False), we stop doing anything. If we are still running though,
we instruct Syntalos to call send_beep() again in 5 seconds, via syl.schedule_delayed_call().
Datatypes you can use with output ports, and commands you can use on input ports can be found in the syntalos_mlink API documentation for reference.
time.sleep(), is possible for delays, it is recommended to use
functions from syntalos_mlink for that purpose. That way Syntalos knows about the waiting state of the module,
and can disrupt a sleeping module to stop it instead of waiting for it. It also allows Syntalos to make smarter
scheduling and queueing decisions.While checking whether we are still running with syl.is_running() is not strictly necessary, it allows for a cleaner
shutdown procedure when Syntalos interrupts the running code at the end of the experiment.
An alternative to this check would be to implement the stop() function, and stop emitting new control commands once that
function has been called.
5. Run it!
You can now run the Syntalos experiment! You should hear a beep sound every 5 seconds. If not (and if your speakers are fine), you can inspect any Python script errors directly in the script window (it has a log at the bottom).
6. Expand it!
This simple example can be easily expanded. For example, you can only record from a camera while a sound is played, or only record while no sound is played. To have finer control over modules, you may need to add multiple control output ports with different IDs. Play around a bit and make the script work for your experiment!