02. Seeing the world, connecting modules
In this tutorial, we will combine multiple modules into a pipeline, and record the first data. This tutorial assumes you are already familiar with the Syntalos interface, as described in the “Hello World” tutorial
1. Creating a new project and adding modules
We assume you have a suitable camera connected to your system for this tutorial. For the Generic Camera module, a simple webcam will be sufficient. For more advanced cameras, separate modules for additional hardware support exist as well.
Create a new Syntalos project, and then add one of each Generic Camera, Canvas and Video Recorder modules:
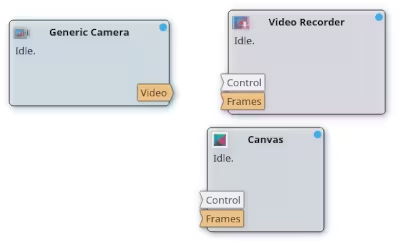
The Canvas module is a display surface to display video frames, while the Video Recorder can be used to record any images to a video file for later analysis. The Generic Camera module supports a variety of USB cameras that use the UVC protocol, which is most webcams and some industrial cameras.
Now, we just need to get the frames from the device that generates them onto our display surface.
2. Configuration
Configure your camera module by opening its settings dialog (either via the Settings button or by double-clicking it). Select a camera that you want to use.
The, open the Video Recorder settings and disable video slicing. If you have a slower computer, but enough disk space, you may also enable post-run encoding by clicking the Encode after Run and Start Immediately checkboxes, so Syntalos does not need to use computing resources for encoding while acquiring data, but can encode videos after the run is finished. By default, Syntalos will encode all videos losslessly using the FFV1 codec, but other codecs are available as well.
3. Connecting modules
We do want to actually see and record the images the camera generates. If you were to start the Syntalos project right now, all modules would remain idle and no data would be displayed or stored. In order for that to occur, frames generated by the camera need to be fed into the canvas and Video Recorder modules.
Every module can have input ports and output ports, where data can be fed in or funneled our respectively. On the module graph, input modules are deonted as boxes on the left side of the module, with an inwards-arrow indentation, while output ports are on the right side with an outwards-arrow shape.
The color of a port represents the data type that this port can accept. When connecting ports, only ports of the same color can be linked. Usually modules also provide a textual hint as to which kind of data is generated or accepted on the module port.
You can connect an output port to as many input ports as you like, but each input port can only accept one connection. Data multiplexing is not possible. Think of connections between ports as physical wires in a experiment setup rack.
To actually make a connection, left-click on the module port, and drag a connection between the two ports, from the output port to an input port. Alternatively you can also hold CTL and click on both ports, and then click the Connect button.
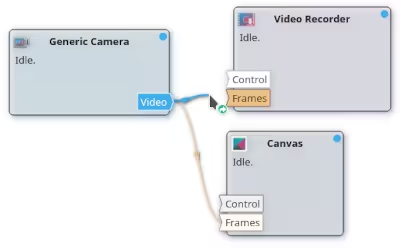
Ensure the Video output port of your camera is connected to both the Frames input ports of the video recorder as well as canvas modules.
3. Run it!
Select a data storage location, and click the Run button. Then double-click on the Canvas module. You should see the camera image displayed. After clicking the Stop button, an encoded video of the just recorded images should be available in the export directory location.
Canvas modules to desychronize with
its imput data. This is usually no reason for concern. Under higher load, Syntalos will (usually temporarily)
sacrifice display speed in order to give enough resources to the data-acquiring module and ensure they receive
data as fast as possible, even if it is displayed later. The same applies for other tasks, like video encoding.4. New names
You might have many cameras and multiple recorders and canvases. Names like Generic Camera 4 are usually not very descriptive and user friendly. Therefore, Syntalos allows you to rename modules to (almost) any name you want.
In order to rename your camera, right-click on its module box, and enter a new name. Confirm your choice by hitting Enter. The Video Recorder module will automatically pick up the new video name from the camera name, but you can also override it in the recorder settings, if you like.
5. Expansions
Modules can be connected in any way, and in arbitrary amounts, to form very complex pipelines. Try adding a Video Transformer module in-between your recorder and canvas modules! This module will allow you to crop and scale the generated video frames, so you will only save what is important to your experiment.
By having multiple video transformers linked to the same camera, you could also save two regions of interest that are extracted from the same camera in separate video files.
Play around with it a little!