Verifying time delays
Syntalos does an excellent job at keeping devices synchronized and at keeping times, but verifying that is better than just believing it! Verifying time synchronization is also also a good regression test to ensure no code or environment change has altered Syntalos’ behavior, and a good test to find any inherent latencies in the system that can be corrected as fixed errors in postprocessing.
Since buying a commercial pulse generator can be expensive, we’ve created a small Raspberry Pi Pico-based device that can be built cheaply and used as test pulse generator.
Pi Pico Pulse Generator Hardware
You will need to acquire the following components:
| Part | Example | URL |
|---|---|---|
| Raspberry Pi Pico | - | Raspberry Pi Pico |
| LEDs | Kingbright LED Array | Mouser |
| N-Ch Mosfet | STP16NF06 | Mouser STP16NF06 |
| Flip Switch | any | - |
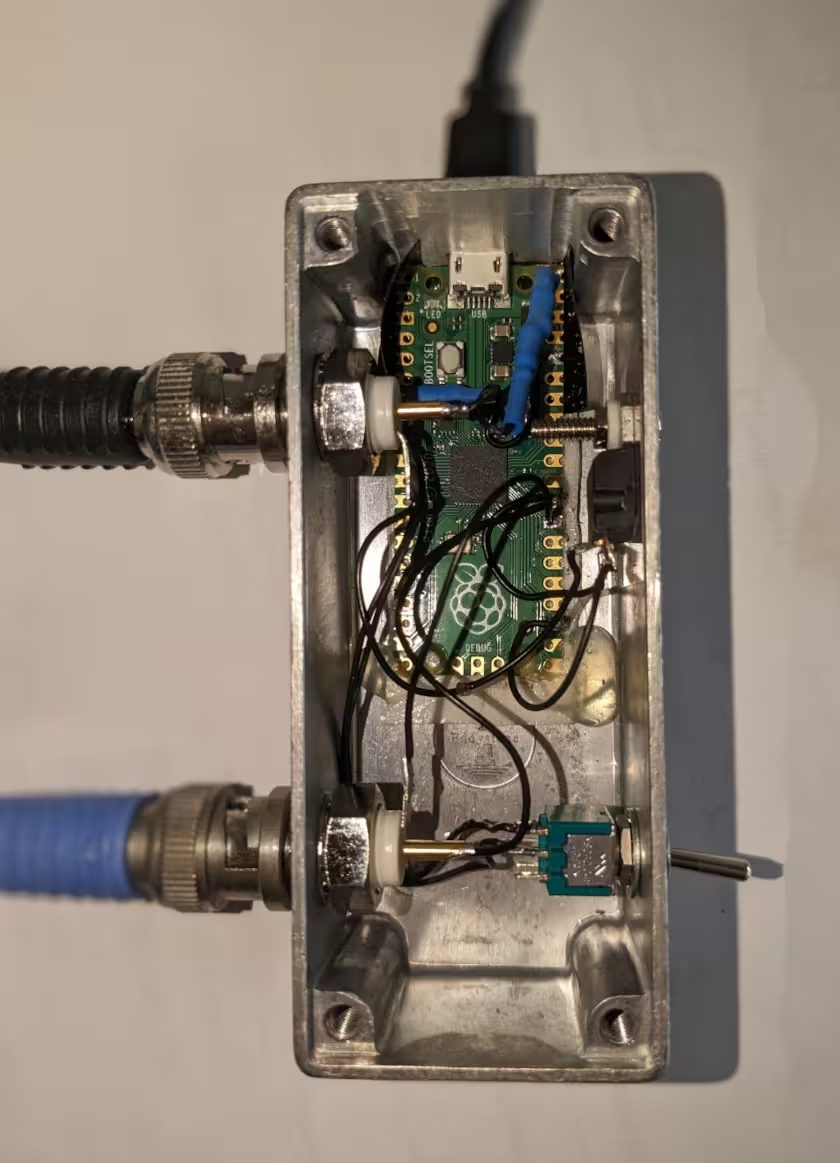
You can fairly easily assemble these components like this:
It is recommended to put the LED on a wire, or even better, a BNC connector, so it can be moved away from the signal generator. The wire will also allow for splitting the electrical signal to feed into other devices.
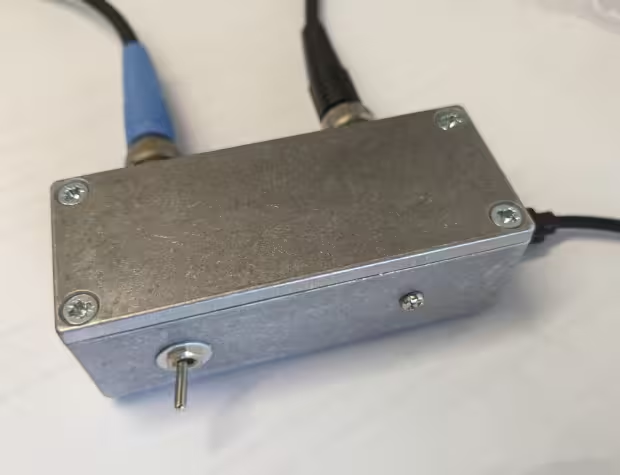
This is how the final result may look like, in a box:


Pi Pico Pulse Generator Firmware
You can now download the prebuilt firmware for the Pico pulse generator and upload it to the device,
or build it yourself.
To build it yourself, clone the Syntalos source code and use cmake for building the files
from contrib/testpulse-generator:
git clone --depth 1 https://github.com/syntalos/syntalos.git
cd syntalos/contrib/testpulse-generator
mkdir build && cd build
cmake -DPICO_SDK_FETCH_FROM_GIT=ON ..
make
This will generate a syntalos-testpulse-generator.uf2 file in contrib/testpulse-generator/build, which you
can then upload to your Pico to make it generate precise(ish) pulses as external control clock.
The switch on the device can be used to select one of two modes, depending on which position it is in when the device is powered on. It can either operate in fixed-interval pulses, or vary the pulse interval.
Syntalos Measurement
There are two types of time synchronization measurement tests that you can perform: Long-running measurements to check whether the device times remain aligned for very long measurements ("Marathon Sync Test"), and short measurements of many experiments where they are continuously started and stopped to determine if the initial time offset between devices is small and constant ("LaunchSync Offset Test").
Simple Firmata Device Latency Test
To test the roundtrip latency of an Arduino or other device that communicates via the Firmata protocol via a serial port, you can use the ArduinoPythonLatencyTest.syct example Syntalos configuration as a starting point.
It will, by default, write a table with the receival time (RecTime) when Syntalos has received data from your device, and the processing time (ProcTime) when the
Python script has seen the data.
You will have to wire up the Arduino (or other device) to the pulse generator and adjust the script accordingly if you used different digital input pins.
In order to determine the true roundtrip latency, you will also have to add a reliable device with a high sampling frequency to the Syntalos configuration, for example the Intan RHX module, and feed the Arduino output and pulse generator TTL output into the respective digital input channels of the Intan board. Alternatively, you can also measure this latency externally with a different device or oscilloscope.
Marathon Sync Test
To validate the long-time synchronization performance of Syntalos as done in Klumpp et al. Syntalos: A software for precise simultaneous multi-modal data acquisition and closed-loop interventions, 11 January 2024, PREPRINT (Version 1) available at Research Square doi.org/10.21203/rs.3.rs-3793251/v1 you first have to acquire a long (multiple hours) recording with the desired devices being triggered by the Pi Pico Pulse Generator as outlined above.
The Syntalos configuration you need depends on the hardware you are testing, but we included the project we used for validation as an
example at syntalos-example-projects.
It includes three cameras, a miniscope, an Intan electrophysiology amplifier, and a latency test in either Python (TimeSyncTest_v5.syct),
native C++ module (TimeSyncTest_v5-CppNative.syct) or C++-scripted module using Syntalos’ MLink interface (TimeSyncTest_v3-CppMLink.syct).
Once you have acquired data, you can use the syntalos-timecheck.py script from the same
repository to generate plots of the time divergence over the recording time. To do that for Marathon long-running experiments,
you will have to adjust DATA_ROOT_DIR to where your data is located, set CURRENT_EXPERIMENT_CLASS to 'marathon' and ensure your experiment
is added with its date to the respective list in sy_timetest/syntalos_tsexp_defs.py.
Depending on how your images were acquired, you may also want to adjust the brightness thresholds to detect the light flashes reliably.
LaunchSync Offset Test
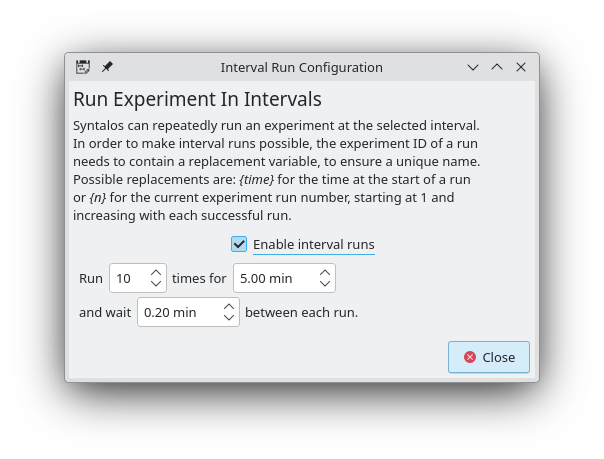
To determine any offset that appears between the different devices when the experiment is re-launched many times, Syntalos’ “Interval Run” feature can be used to simplify the process. To use it, click on Tool → Interval Run in the Syntalos UI.
This dialog should open:

In it, you can select how many times you want the experiment run to be repeated, and how much time should pass between multiple experiment runs.
Make sure that you have set a placeholder in yor experiment name, either {n} for the experiment number, or
{time} for the experiment time.
A valid experiment name for an interval-run experiment may for example be Launch-{n}
If you do not set a placeholder, Syntalos will try to override existing data and prompt you about that every time.
You can start an Interval Run experiment just like a normal experiment (using the Start button), and also stop it the same way. If an interval run is active, Syntalos will display that fact in the information panel of the current experiment.
Once data has been acquired, you can use the syntalos-timecheck.py script (from the same
repository that is used to analyze “Marathon” experiments as well) to as a starting point of a script to analyze the data.
You will have to adjust DATA_ROOT_DIR to where your data is located, set CURRENT_EXPERIMENT_CLASS to 'launchsync' and ensure all launch experiments
are added to the respective list in sy_timetest/syntalos_tsexp_defs.py.
You can then generate plots as shown in the Klumpp et al. publication mentioned in the section above, but for the time divergences upon launching the same experiment many times. Keep in mind that, just like for the Marathon experiments, you will have to adjust the script to fit your individual selection of devices. The provided scripts are just illustrative, as this analysis cannot be easily fully automated due to the wide variety of involved hardware.